


MHarris281
Member
So Yesterday through heavy snow and and a long well worth it journey I picked up my new baby boy Flemish Giant from the kind people at South Mountain Rabbitry in Knoxville, MD. In preperation for this I did alot of research on what I would use as a place for him so stay at night and be able to just get away from the Kids. So I stumbled apon this website when I was searching for a breeder. I read alot of the posts on the NIC ( Neat Idea Cubes) but they all seamed kinda small so i took ideas from different projects and came up with my own and all of it cost less than $125.
What you will need
1. 4 Boxes of NIC 23 per box at 14.5" x 14.5" (Bought mine at target for $15 a box)
2. 1 Sheet of 4' x 8' Coroplast ( from your local Sign store about $25)
3. Plastic Zip Ties ( about $18 from Home Depot for 1k of the 5")
4. Dog Cips the kind you would see on a dog run a pack of 2 is about $2.50 from Home Depot depending on the amount of doors and access points you need will depend how many you need.
5. Flooring material for the shelf they they do not need to stand on wire flooring as it can hurt the Hocks of there feet bad and a baby will not be able to at all as the holes are to big and there feet will fall through.
6. Something to cover the enclosure section of the cage so your rabbit has a place to hide out as it is instinctual that they will fear something flying in to get them they will feel more secure being able to hide.
Ok so lets get started First lets get the supplies we will need.
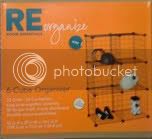
Here is the type of NIC Crates I got I chose 2 boxes of white and 2 Boxes of black to do a nice checkered pattern.
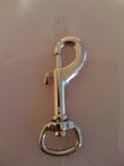
The Dog clips I also Picked up at Home Depot for about $2.50 for 2
then get the Coroplast here is a link the there website so you know what it is Coroplast Website
Ok i have provided a basic layout to the cage I built.
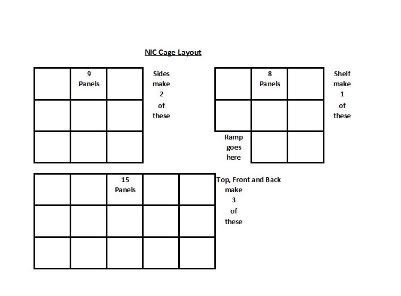
NOTE: the cubes come in two different sizes be sure to put the crates with the smaller holes as the bottom row completely and the shelf. as a baby Flemish can get his head through the bigger holes
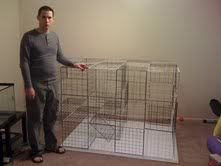
Once you have the panels built it time to assemble them and im sure your fingers are tired of the wire ties by now I would suggest using pliers to pull the wire ties tight it will help greatly .
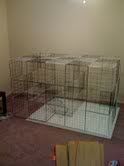
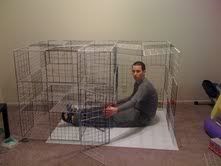
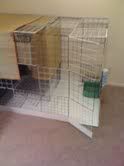
Start by putting the end pieces and the front and back on but do not secure one of the corners that way you can get in to secure the shelf on. Once you have the shelf in place secure the ramp in at an angle were they will be able to easily climb up and down. as babies they may not feel comfortable jumping almost 15" to get to there hide out. also be sure to cover the ramp with somthing to that his feet do not fall through beside the ramp you have 2 options here depending on you you can close off the underside of the hide out completly or you can leave it open to let your Flemish under it keep in mind this area will be difficult to clean, if you chose not to close it in you will need to use a dowl for added support to the roof if you do close it in this will be the majority of your roof support. so lets see what we have done thuse far it should look like this.
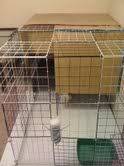
You can use ruges or what ever it is you think will work best within your budget to make the flooring of the hide out I used floor rugs as mine.
 Just ignore the kitty
 ")
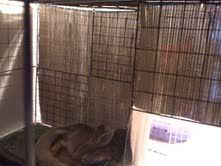
To cover the hide out you can use either coroplast cut to fit and with a screw driver put a hole in it to be able to run a wire tie through it and secure it I used grass beach mats but to be honest I will be replacing this with Coroplast as it did work out like I thought it would.

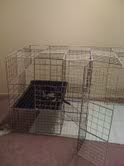
Now the flooring take your piece of 4x8 Coroplast and place it on the ground then center your new cage on top of it and trace around your cage with a marker then take it out and without cutting all the way through cut out were you marked so that it will fold up you will ahve to cut all the way through the corners so that you can make the folds. and with your screw driver make holes in it and zip tie it to the cage if you want. or I use white Duct tape on the orners to keep it in a box and only zip tie the areas i need to like at the door. as shown.( the coroplast is very easy to clean just sweep out the cage then wipe it down with a baby wipe.


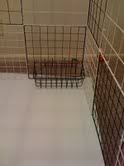
As you notices I have a litter box in there which I will be changing out to a much larger one and a water bottle secured to the outside to that he cannot chew on it and a hay basket for his hay.
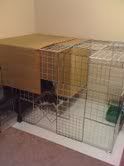
there you have it a NIC Bunny condo fit for a King or a Flemish Giant
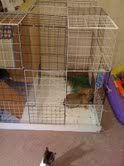

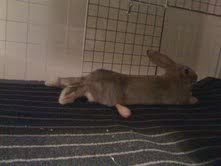
And a shot of Simon my baby boy curled up in his bed safe and secure inside is hide out.
And that's my NIC cage for Simon

If you have any questions please fill free to ask I'm sorry i didn't take more pictures during the process it took about 6 hours to build by myself while my 1 year old helped (which was not helping lol) Also if you have any suggestions please let me know with all creations there works in progress thank you.
Michael
Special Thank to Nora and Scott Wenzell of South Mountain Rabbitry for allowing me to adopt Simon and also to Bessie and Guenther his proud mom and dad without them he would not be here.
What you will need
1. 4 Boxes of NIC 23 per box at 14.5" x 14.5" (Bought mine at target for $15 a box)
2. 1 Sheet of 4' x 8' Coroplast ( from your local Sign store about $25)
3. Plastic Zip Ties ( about $18 from Home Depot for 1k of the 5")
4. Dog Cips the kind you would see on a dog run a pack of 2 is about $2.50 from Home Depot depending on the amount of doors and access points you need will depend how many you need.
5. Flooring material for the shelf they they do not need to stand on wire flooring as it can hurt the Hocks of there feet bad and a baby will not be able to at all as the holes are to big and there feet will fall through.
6. Something to cover the enclosure section of the cage so your rabbit has a place to hide out as it is instinctual that they will fear something flying in to get them they will feel more secure being able to hide.
Ok so lets get started First lets get the supplies we will need.
Here is the type of NIC Crates I got I chose 2 boxes of white and 2 Boxes of black to do a nice checkered pattern.
The Dog clips I also Picked up at Home Depot for about $2.50 for 2
then get the Coroplast here is a link the there website so you know what it is Coroplast Website
Ok i have provided a basic layout to the cage I built.
NOTE: the cubes come in two different sizes be sure to put the crates with the smaller holes as the bottom row completely and the shelf. as a baby Flemish can get his head through the bigger holes
Once you have the panels built it time to assemble them and im sure your fingers are tired of the wire ties by now I would suggest using pliers to pull the wire ties tight it will help greatly .
Start by putting the end pieces and the front and back on but do not secure one of the corners that way you can get in to secure the shelf on. Once you have the shelf in place secure the ramp in at an angle were they will be able to easily climb up and down. as babies they may not feel comfortable jumping almost 15" to get to there hide out. also be sure to cover the ramp with somthing to that his feet do not fall through beside the ramp you have 2 options here depending on you you can close off the underside of the hide out completly or you can leave it open to let your Flemish under it keep in mind this area will be difficult to clean, if you chose not to close it in you will need to use a dowl for added support to the roof if you do close it in this will be the majority of your roof support. so lets see what we have done thuse far it should look like this.
You can use ruges or what ever it is you think will work best within your budget to make the flooring of the hide out I used floor rugs as mine.
To cover the hide out you can use either coroplast cut to fit and with a screw driver put a hole in it to be able to run a wire tie through it and secure it I used grass beach mats but to be honest I will be replacing this with Coroplast as it did work out like I thought it would.
Now the flooring take your piece of 4x8 Coroplast and place it on the ground then center your new cage on top of it and trace around your cage with a marker then take it out and without cutting all the way through cut out were you marked so that it will fold up you will ahve to cut all the way through the corners so that you can make the folds. and with your screw driver make holes in it and zip tie it to the cage if you want. or I use white Duct tape on the orners to keep it in a box and only zip tie the areas i need to like at the door. as shown.( the coroplast is very easy to clean just sweep out the cage then wipe it down with a baby wipe.
As you notices I have a litter box in there which I will be changing out to a much larger one and a water bottle secured to the outside to that he cannot chew on it and a hay basket for his hay.
there you have it a NIC Bunny condo fit for a King or a Flemish Giant
And a shot of Simon my baby boy curled up in his bed safe and secure inside is hide out.
And that's my NIC cage for Simon
If you have any questions please fill free to ask I'm sorry i didn't take more pictures during the process it took about 6 hours to build by myself while my 1 year old helped (which was not helping lol) Also if you have any suggestions please let me know with all creations there works in progress thank you.
Michael
Special Thank to Nora and Scott Wenzell of South Mountain Rabbitry for allowing me to adopt Simon and also to Bessie and Guenther his proud mom and dad without them he would not be here.